DATA
Data
This Module covers answer keys, section, scoring, and data analysis.
Answer key:
In the Answer Key tab, you need to upload the correct answers for the questions along with the Right Score, Wrong Score, and Bonus settings.
Please refer to the image below:
KEY: In this column, you need to enter/upload the correct answers (e.g., C, A, C, A, B).
Right Score: In this column, enter the marks allotted for each correct answer (e.g., 2.5 marks for a right answer).
Wrong Score: If negative marking is applicable, enter the marks to be deducted for each wrong answer (e.g., 0.83 marks will be deducted for incorrect responses).
BONUS: If any question is incorrect or out of syllabus and you want to award marks to all students, enable the bonus option for that question. (As shown in the image below, Q5 has bonus enabled, so each student will receive 2.5 marks.)
SECTION:
The sections here is created to show the result subject wise or section wise, you need to create sections for same accordingly.
Please refer to the image below for your reference.
HOW TO ADD A SECTION:
Step 1: Enter the name of the section or subject (e.g., PHY).
Step 2: Specify the total number of questions to be included under the Physics section (e.g., 45 questions).
Step 3: Click on Select Questions, enable the Range Select option, and enter the question range (start to end) for the Physics section in the OMR (e.g., questions 1 to 45).
Please refer to the image below for your reference.
Section for Physics will be added successfully as shown in the image below:
Apply Score:
Under the apply Score we have two condition
TOP CASE- Top attempted questions by the candidate
BEST CASE- Top attempted right questions by the candidate
Note: Under the Top and best case we have another two option:
Default- As the term explains bonus will apply on both attempted or unattempt questions.
Bonus on attempted only- As the term explains bonus will apply on the attempted questions only.
Ascending Order: Arranged from smallest to largest or A to Z.
Examples:
Numbers: 1, 2, 3, 4, 5
Letters: A, B, C, D
Descending Order: Arranged from largest to smallest or Z
Examples- 5, 4, 3, 2, 1
Letters: Z, Y, X, W
Find: It helps you locate a word, number, or value quickly without reading everything.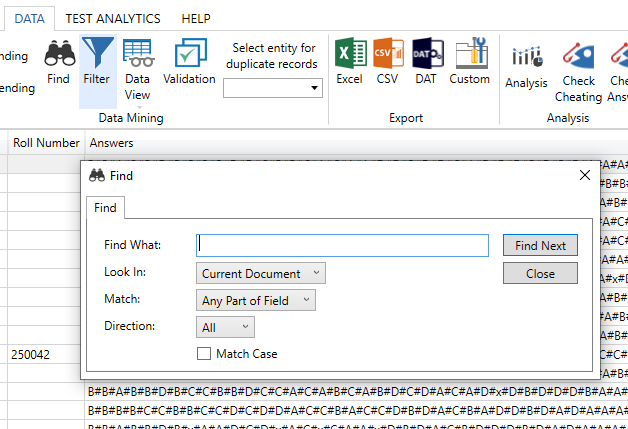
Validation
The validation tool allows the user to verify the checks configured during the designing stage.
Validation checks include:
Mandatory
The Mandatory check lists those fields that are set as mandatory but have no value while reading the sheets. The respective record will be highlighted with the color specified by the user at the time of design.
Maximum Value
The Maximum Value check allows the user to set a maximum limit for the value of an entity. If the value exceeds the defined limit, the row will be highlighted with the color specified by the user.
Length
Length validation checks the length of the entity. If the length of the entity is less than or greater than the defined length, the record will be highlighted with the specified color.
Data View
Data Views are instances created after filtering data using a set of queries. Users can save a view and retrieve it later using the Save View and Load View functionality.
Export Functionality
Excel : This function enables the user to export the data in Excel format.
CSV : This function enables the user to export the data in CSV format.
Custom: This function enables the user to export the data in the desired format, such as SQL, MySQL, Access, etc.
Analysis
The Analysis feature displays informational statistics in the form of pie charts or other pictorial representations.
To view the analysis:
Add the required entity to the Analysis section during the design phase.
Then select the entity in the Data section to generate the analysis.
Pictorial Analysis
Show All Records
This option displays all records present in the grid. It functions as a refresh button
Publish OMR Data
This option publishes the data read by Verificare to the server.
Check Cheating: This module provides a facility to predict the probability that a student may have attempted to cheat. It identifies pairs of students who may have copied from each other.
The module is based on a logical comparison of responses, specifically analyzing the number of identical incorrect answers above a defined threshold.
This window displays the list of students whose wrongly marked options were found to be the same.
Select Entity for Duplicate records:
Duplicate records can be identified using a unique Id, which is a value expected to be unique for each individual record. Any repetition of this value indicates a duplicate entry.
Common examples include:
Roll Number
Registration Number
Employee ID
Invoice Number
Export data
As shown in the image below, users can now export the data by choosing the relevant columns only.
Imprinting OMR Sheets and Syncing Results in Verificare
This guide explains how to imprint OMR sheets in Verificare and display the sheets, along with results, to candidates using Cloud Reporting.
Accessing Imprinting Settings
After reading all the OMR files in Verificare, open any record from the list.
Click on the Image Path of that record to view the scanned OMR sheet.
An image viewer will open. Here, click on the Imprinting Settings button.
Configuring Imprinting Options
In the Imprinting Settings window:
Enable Show Answer Key if you want candidates to view the correct answers on their OMR sheet.
Enable Show Score if you want candidates to view their score on the sheet.
These options determine what will be visible to candidates in the Cloud Reporting panel.
You may click the Preview button to see a live preview of the imprinted OMR sheet before proceeding.
After configuring the settings, click the Imprint button.
Once imprinting is done, a new folder named imprinted sheet will be created automatically in the same directory where the VER file is stored.
Related Articles
What is the Data Module in Verificare?
The Data Module is used to import, manage, verify, edit, and export OMR data after the sheets have been scanned and processed.How can I verify the scanned data?
Compare the scanned image with the interpreted responses in the Data Module before exporting the result.Which file formats can be imported into the Data Module?
The Data Module supports importing Excel (.xlsx, .xls), CSV (.csv), and other compatible data files as configured.Can I view the scanned OMR image while checking data?
Yes. Verificare allows you to view the scanned OMR image while reviewing the captured data. To view the scanned image: Complete the OMR sheet reading process. Open the Review Answers section. Select the candidate whose data you want to verify. The ...What should I do if a candidate's data is missing?
Check that: * The sheet was scanned correctly. * The sheet was processed successfully. * The correct VER project is open. * The candidate record exists in the imported database.