How to attempt a Proctored Test?
How to Attempt a Proctored test
Step 1: Login
On the login page, enter your login credentials (ID & Password) which you should have received via email.
Step 2: Start Test
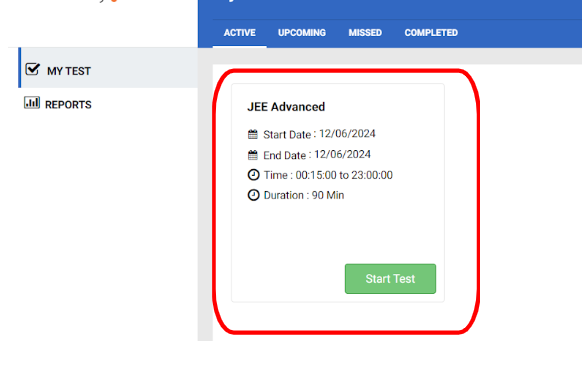
- Click on "Start Test" to begin the system check and verification process.
Step 3: System Check
Click "Allow" for screen sharing and select the Entire screen option. Check the box below and then click "Share".
Allow camera permissions by clicking on the "Allow" button.
Allow microphone permissions by clicking on "Allow" again. You may have to speak a few words so the system can check your microphone
After the network check, you will proceed to the Photo verification step.
Step 4: Photo Verification
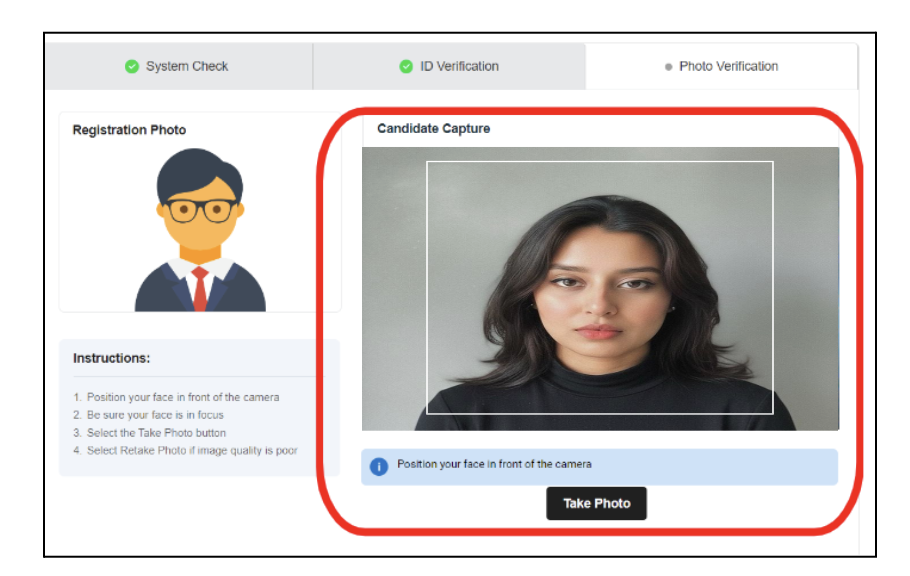
Position your Face correctly in the box and click "Take Photo".
Click "Verify".
After the verification is complete, click on the "Next" button to proceed to the Instructions page.
Step 6: Instructions
Review and acknowledge the general instructions displayed on your screen, check the box, and then click "Next".
Review and acknowledge the test instructions, then click "Next".
The system will prompt you to share your screen again. Repeat the same steps: select the entire screen, check the box, and click "Share".
You should now be able to see the test questions and begin your test.
Following these steps ensures that you meet the requirements for a proctored test and can proceed smoothly with your exam.
Step 7: Attempting Questions
After acknowledging the test instructions, you will see the questions.
Click on the correct option and then click on the “Save & Next” button to move to the next question. Alternatively, use the “Save Response” button to save your responses for each question.
You can navigate through the questions using the Question Palette on the right side of the screen.
The timer displays the time left to submit your test.
Once you have answered all the questions, click on the “Submit Test” button to submit your test.
Related Articles
How to attempt a Proctored Test?
Overview: To successfully attempt a proctored test on Think Exam, follow these steps: Step 1: Login On the login page, enter your login credentials (ID & Password) which you should have received via email. Step 2: Start Test Click on "Start Test" to ...How to create a proctored Test?
Proctoring settings: Overview This setting enables you to activate proctoring for the test, allowing you to configure the proctoring settings based on your needs. There are two types of proctoring available: Manual Proctoring With this option, a ...How to create a test from Test Manager?
To create a test, follow the steps given below. Step 1 : create Test 1.Click on the “Test Manager” Tab and then click on the “Test” button. 2. Now click on the “Add” button which is on the right hand side of the screen. 3. Here, add all relevant ...How to reset Test Attempt?
Overview Resetting a test attempt allows you to give candidates another opportunity to take the test, whether they've accidentally submitted it or wish to reattempt it. Steps to Reset a Test Attempt Method 1 1. Navigate to the Test Manager and click ...How to attempt an Online Test?
Step 1 : Login On the candidate login page - enter your credentials such as email Id and password and then click on the login button. After logging in, in the “Active” tab you will find the test which you need to attempt. ( In case no test(s) are ...